4 Vital Signs Measurement and Pain Assessment Across the Lifespan
Learning Objectives
- Obtain accurate vital signs using correct techniques.
- Recognize deviations from normal when assessing vital signs.
- Document vital signs accurately.
- Identify the age-appropriate tools to assess a patient for pain.
- Obtain pain history.
- Describe the different types of pain.
- Document the Pain Assessment finding
I. Overview of Vital signs and Pain:
Vital signs are used to obtain specific physiological statistical measurements. There are five vital signs that are routinely taken including temperature, heart rate also called pulse rate, respiration, blood pressure, and oxygen saturation (Perry, Potter, & Ostendorf, 2014). These measurements are used to monitor the hemodynamic status of the patient. Previously taken vital signs, at home or at a health care facility, are documented as part of the subject data obtained during the health history interview. This data is important as it provides each patient’s vital signs ranges/parameters. A distinct change in vital signs from normal levels may indicate that further investigation and closer monitoring is needed at home or at a facility by health care personnel, or admission to the hospital is needed.
The first set of vital signs taken by the nurse in any setting is used as a starting point to determine patient care and these are frequently called the baseline vital signs. These are completed as ordered by the health care provider upon admission to the hospital. Changes in any of the five vital signs may indicate that the patient’s conditioning is improving or worsening.
Each of the five vital signs is written in a specific manner and is associated with a unit. Temperature is written in Celsius or Fahrenheit and it is measure in degrees also written as º. Heart rate is measure as beats per minute also written as BPM. Respirations are written as breath per minute also written as BPM. Blood Pressure is measured in millimeters of mercury written mmHg. There is a specific order in which vital signs are documented: Temperature, pulse/heart rate, respiration rate, blood pressure, and lastly pulse oximeter reading: T, P, R, BP, Pulse ox
Vital signs are the first part of a thorough, comprehensive health assessment and are completed prior to obtaining the rest of the patient’s health history, or prior to performing an objective examination or physical assessment. Accurate measurement of vital signs is necessary but it is also important for the nurse to learn the significance of each vital sign to the current patient status. This is essential to developing sound nursing clinical reasoning and decision-making.
II. Anatomy and Physiology of Vital Signs
Temperature refers to the degree of heat or cold in an object or a human body. In humans, the brain’s hypothalamus acts as the body’s thermostat and is responsible for regulating its temperature.
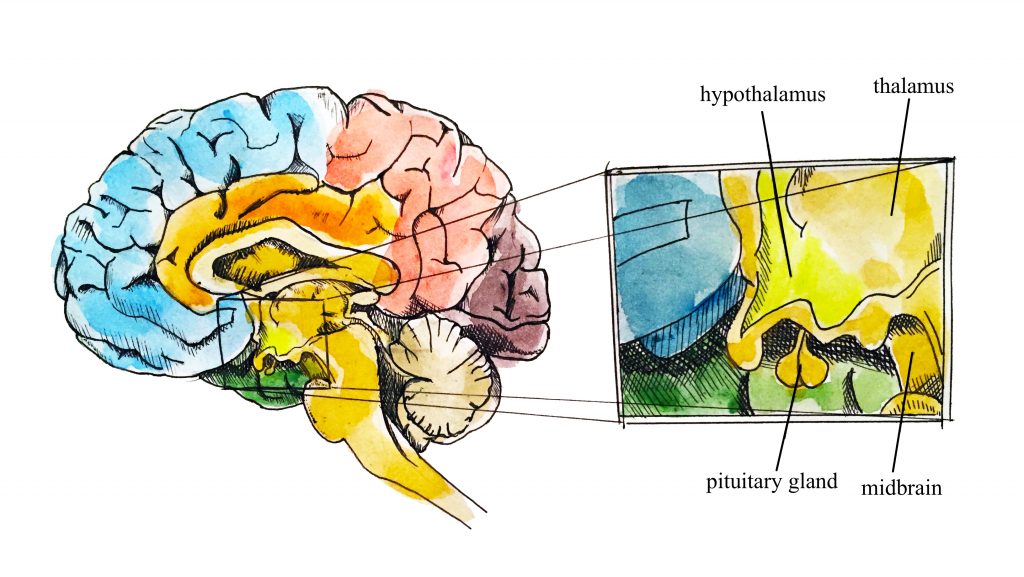
Hypothalamus (Illustration credit: Hilary Tang)
Temperature regulation:
Humans have a temperature regulation feedback system that works by promoting either heat loss or heat gain. When the brain’s temperature regulation center receives data that the body is too hot, it stimulates a cluster of brain cells referred to as the “heat-loss center.” These stimulated cells initiate three changes:
- Skin blood vessels dilate allowing more blood from the body core to flow to the surface of the skin allowing the heat to release into the environment.
- Sweat glands are activated to increase their output which increases sweat evaporation and heat release into the environment.
- Respirations have deepened to increase heat loss from the lungs.
When the body is too cold it activates the brain’s heat-gain center to reduces blood flow to the skin, therefore, blood returning from the limbs is diverted into a network of deep veins. This arrangement traps heat closer to the body core, restricts heat loss, and increases blood pressure. If heat loss is severe, the brain triggers an increase in random signals to skeletal muscles, causing them to contract and producing shivering. The muscle contractions of shivering release heat while using ATP. The brain also triggers the thyroid gland in the endocrine system to release thyroid hormone, which increases metabolic activity and heat production in cells throughout the body.
Why is Temperature Measured?
Healthcare providers measure a patient’s temperature because it can give information about their state of health and influence clinical decisions. Accurate measurements and interpretation are vital so that hyperthermia and hypothermia can be identified and appropriate interventions determined.
Hyperthermia refers to an elevated body temperature. It can be related to an internal or external source. External sources that increase body temperature could include exposure to excessive heat on a hot day or being in a sauna or hot tub. Internal sources that may increase body temperature include fever caused by an infection or tissue breakdown associated with physical trauma (e.g., surgery, myocardial infarction) or some neurological conditions (e.g., cerebral vascular accident, cerebral edema, brain tumor). Hyperthermia that is associated with an infectious agent, such as a bacteria or virus (e.g., the flu) is referred to as febrile. Unresolved hyperthermia can lead to cell damage.
Hypothermia refers to a lowered body temperature. It is usually related to an external source such as being exposed to the cold for an extended period of time. Hypothermia is sometimes purposefully induced during surgery, or for certain medical conditions, to reduce the body’s need for oxygen. Unresolved hypothermic body states can slow cellular processes and lead to loss of consciousness.
What is Pulse?
A pulse refers to a pressure wave that expands and recoils the artery when the heart contracts/beats. There are several points throughout the body to assess a pulse:
Heart/Pulse Rate regulation:
The heart is the main organ of the cardiovascular system. It acts as a pump and propels blood through the blood vessels. The average heart beats about 100,000 times a day, circulating about 2,000 gallons of blood through about 60,000 miles of blood vessels. An adult has, on average, 5 to 6 quarts of blood. The average adult resting heart rate is 72 bpm (beats per minute). Heart rate is the number of times the heartbeats per minute. The speed of the heart rate is also controlled by the central nervous system via a negative feedback loop with the sympathetic nervous system speeding up the heart rate and the parasympathetic nervous system slowing down the heart rate.

Cardioaccelerator and cardioinhibitory areas are components of the paired cardiac centers located in the medulla oblongata of the brain. They innervate the heart via sympathetic cardiac nerves that increase cardiac activity and vagus (parasympathetic) nerves that slow cardiac activity.
Reflection:
It is important to consider each patient, the situation the patient is in, the context-overall health, and known baseline pulse rate, to determine whether the heart rate obtained is normal. The healthcare provider also considers the patient’s health and illness state and determinants such as rest/sleep, awake/active, and presence of pain. A higher pulse rate is expected when a patient is in a stressed state such as when crying or in pain; this is particularly important in the newborn. It is best to complete the assessment when the patient is in a resting state. If the pulse rate is obtained when the patient is not in a resting state, document the circumstances (e.g., stress, crying, or pain) and reassess as needed.
What is Respiration?
Respiration refers to a person’s breathing and the movement of air into and out of the lungs. The respiratory system provides oxygen to body tissues for cellular respiration, removes the waste product carbon dioxide, and helps maintain acid–base balance. Inspiration is the process that causes air to enter the lungs, and expiration is the process that causes air to leave the lungs. A respiratory cycle (or one breath while you are measuring respiratory rate) is one sequence of inspiration and expiration.
Respiration regulation:
Respiration is controlled by the respiratory center in the brain stem in response to carbon dioxide (CO2) levels mostly but also affected by oxygen and hydrogen ions levels. The Medulla Oblongata sets the basic rhythm of breathing (pacemaker) while the Pons smooths out respiratory rate and influence depth and length of respiration.

Respirations are assessed for quality, rhythm, and rate.
The quality of a person’s breathing is normally relaxed and silent. Healthcare providers assess use of accessory muscles in the neck and chest and indrawing of intercostal spaces (also referred to as intercostal tugging), which can indicate respiratory distress. Respiratory distress can also cause nasal flaring, and the person often moves into a tripod position. The tripod position involves leaning forward and placing arms/hands and/or upper body on one’s knees or on the bedside table.
Respiration normally has a regular rhythm. A regular rhythm means that the frequency of the respiration follows an even tempo with equal intervals between each respiration. If you compare this to music, it involves a constant beat that does not speed up or slow down, but stays at the same tempo.
Respiratory rates vary based on age. The normal resting respiratory rate for adults is 10–20 breaths per minute. Children younger than one year normally have a respiratory rate of 30–60 breaths per minute, but by the age of ten, the normal rate is usually 18–30. By adolescence, the respiratory rate is usually similar to that of adults, 12–18 breaths per minute. The normal respiratory rate for children decreases from birth to adolescence. Respiratory rates often increase slightly over the age of sixty-five.
It is important to consider the patient and the situation to determine whether the respiratory rate is normal. Healthcare providers take into consideration the patient’s health and illness state and determinants such as rest/sleep, awake/active, presence of pain, and crying when assessing the respiratory rate.
Blood Pressure regulation:
Blood pressure (BP) is the pressure exerted by blood on the walls of a blood vessel that helps to push blood through the body. Systolic blood pressure measures the amount of pressure that blood exerts on vessels while the heart is beating. The optimal systolic blood pressure is 120 mmHg. Diastolic blood pressure measures the pressure in the vessels between heartbeats. The optimal diastolic blood pressure is 80 mmHg. Many factors can affect blood pressure, such as hormones, stress, exercise, eating, sitting, and standing. Blood flow through the body is regulated by the size of blood vessels, by the action of smooth muscle, by one-way valves, and by the fluid pressure of the blood itself.
Regulation of blood pressure
Oxygenation regulation.
Oxygen saturation refers to the percentage of hemoglobin molecules saturated with oxygen. Hemoglobin molecules can each carry four oxygen molecules; the oxygen binds or attaches to hemoglobin molecules. Oxygen saturation provides information about how much hemoglobin is carrying oxygen, compared to how much hemoglobin is not carrying oxygen.
Healthcare providers measure oxygen saturation because it provides information about a patient’s state of health. The body’s tissues and organs require oxygen for metabolism, and oxygen saturation can reveal whether there is sufficient oxygen in the blood or whether the client is in a state called hypoxemia (insufficient oxygen in the blood).
A pulse oximetry device is used to measure arterial oxygenation levels non-invasively by utilizing a built-in sensor to measure the light absorption of hemoglobin. The sensor measures “the relative amount of light absorbed by oxyhemoglobin and unoxygenated (reduced) hemoglobin” and compares the amount of “light emitted to light absorbed” (Jarvis, 2014, p. 164). This comparison is then converted to a ratio and is expressed as a percentage of Sp02. The ‘p’ in Sp02 refers to pulse or pulsatile flow. If the pulsatile flow is limited or obstructed, an oxygen saturation level will not be accurate. For example, the compression of a blood pressure cuff will obliterate the pulsatile flow so blood pressure and pulse oximetry should not be taken simultaneously on the same limb.

Knowledge check
III. Medical Terminology
| Afebrile | without fever |
| Apical Pulse | auscultated with a stethoscope over the chest where the heart’s mitral valve is best heard. In infants and young children, the apical pulse is located at the fourth intercostal space at the left midclavicular line |
| Apnea | Absence of respirations; temporary cessation of respiration |
| Arrhythmia | Irregular heartbeat |
| Auscultation | the technical term for listening to the internal sounds of the body, usually using a stethoscope. |
| Bradycardia | a heart rhythm problem in which the heart beats slower than normal |
| Carotid Pulse | the pulse felt over the carotid artery, which lies between the larynx and the sternocleidomastoid muscle in the neck. |
| Chronic pain | Is a disease process itself, pain persists over a longer period of time than acute pain and is resistant to most medical treatments |
| Cyanosis | parts of the body are not getting enough blood and oxygen leading to dusky or blue mucus membranes, lips, and fingernails. |
| Diastolic Blood Pressure | the lowest pressure within the bloodstream, occurring between heartbeats because of diastole. |
| Dyspnea | shortness of breath (SOB) is an indication of respiratory distress. |
| Homeostasis | the body’s ability to maintain a stable internal environment (regulating hormones, body temp., water balance |
| hypercapnia | the build-up of Carbon Dioxide in the bloodstream and affect patients with Chronic Obstructive Pulmonary Disease (COPD) |
| Hypertension | systolic blood pressure ≥140 mmHg and diastolic blood pressure < 90 mmHg or systolic blood pressure < 140 mmHg and diastolic blood pressure ≥90 mmHg). |
| Hyperthermia (fever) | body temperature that is over 101 degrees Fahrenheit (equal to 38.3 degrees Celsius). |
| Hypotension | low blood pressure |
| Hypothermia | a low body temperature, below 95 degrees |
| Neuropathic pain | “caused by a lesion or disease of the somatosensory nervous system” and can relate to the peripheral or central nervous system |
| Visceral pain | comes the internal organs |
| Nociceptive pain | from a somatic structure like joint, bone, skin |
| Orthopnea | unable to breathe lying down. |
| Phantom Pain | painful sensation in a limb that has been amputated |
| Pyrexia | high Fever |
| Radial Pulse | the beat of the heart as felt through the walls of a peripheral artery, felt at the radial artery at the wrist |
| Referred Pain | felt in an area that is not injured and is associated with visceral pain |
| Somatic pain | comes from skin muscle and soft tissue |
| Sphygmomanometer | instrument calibrated for measuring blood pressure in mmHg |
| Systolic Blood Pressure | the pressure created in the arteries by the blood during ventricular contraction |
| Tachycardia | fast, or rapid, heartbeat (usually more than 100 beats per minute in an adult) |
| Tachypnea | rapid breathing |
Knowledge check
IV. Step by Step Assessment
- Perform hand hygiene.
- Check room for contact precautions.
- Introduce yourself to the patient.
- Confirm patient ID using two patient identifiers (e.g., name and date of birth).
- Explain the process to the patient.
- Assemble equipment prior to starting the exam.
- Be organized and systematic in your assessment.
- Use appropriate listening and questioning skills.
- Listen and attend to patient cues.
- Ensure patient’s privacy and dignity.
- Apply principles of asepsis and safety.
Vital Signs:
Temperature
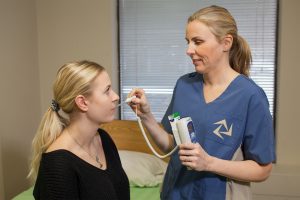
Methods of measuring a patient’s body temperature vary based on developmental age, cognitive functioning, level of consciousness, state of health, safety, and agency/unit policy. The healthcare provider chooses the best method after considering patient safety, accuracy, and least invasiveness, all contingent on the patient’s health and illness state. The most accurate way to measure core body temperature is an invasive method through a pulmonary artery catheter. This is only performed in a critical care area when constant measurements are required along with other life-saving interventions.
Methods of measurement include oral, axillary, tympanic, rectal, and dermal routes.
According to the American Academy of Pediatrics, a digital thermometer is the best thermometer to check a child’s temperature. There are several types. The rectal temperature is most accurate from birth to 3 months. Temporal -forehead thermometers can be used on all children. his method can involve holding the device and sliding it over the skin of the forehead and then, down over the temporal artery in one motion. The tympanic thermometer should be used on children 6 months or older. (healthyChildren.org)
Taking a rectal temperature Technique:
Use a multi-use digital thermometer or a rectal thermometer. The thermometer should have a flexible tip with a wide handle for easy insertion into the baby’s rectum. If a multi-use digital thermometer is used then designate it and label it for rectal use only another thermometer is to be used for any other temperature route.
Clean and lubricate the thermometer by wiping the tip of the digital thermometer with an alcohol wipe or a cotton swab dipped in rubbing alcohol or wash the tip in soap and water. Rinse the soap away with cool water. Avoid rinsing the thermometer with hot water since this could cause inaccurate temperature readings. Rub a little bit of petroleum jelly or lubricant on the end of the thermometer.
Position the baby in any one of three options. Supine on a table and use one hand to bend the baby’s legs towards the chest so the bottom is exposed and use the other hand to gently insert the thermometer into the baby’s rectum. The second method is to place the baby prone with knees tucked up underbelly and the last option is to hold the baby prone on your lap. Only insert it 1/2 inch to an inch (1.3 to 2.5 cm) into the rectum. Hold the thermometer in place while cupping your baby’s bottom. Leave the thermometer in place until a beep is heard signaling that the temperature was recorded. Remove the thermometer and write down the temperature. There is a risk of injuring the baby’s rectum if the thermometer is inserted more than an inch.

Taking an oral temperature: Technique:
Remove the probe from the device and place a probe cover (from the box) on the oral thermometer without touching the probe cover with your hands. Place the thermometer in the patient’s mouth under the tongue and instruct the client to keep the mouth closed and not to bite on the thermometer. Ensure the thermometer probe is in the posterior sublingual pocket under the tongue, slightly off-center. Leave the thermometer in place for as long as is indicated by the device manufacturer. The thermometer will beep within a few seconds when the temperature has been taken: most oral thermometers are electronic and provide a digital display of the reading. Discard the probe cover in the garbage (without touching the cover) and place the probe back into the device.
Oral temperature can be taken with patient who can follow instructions. Commonly used for patients over the age of four, or even younger children if they are cooperative. Research related to taking an accurate oral temperature:
https://www.youtube.com/watch?v=rFFFvunPES8.
Taking a Tympanic temperature: Technique:
Remove the tympanic thermometer from the casing and place a probe cover (from the box) on the thermometer tip without touching the probe cover with your hands. Only touch the edge of the probe cover (if needed), to maintain a clean technique. Turn the device on. Ask the patient to keep their head still. For an adult or older child, gently pull the helix up and back to visualize the ear canal. For an infant or younger child (under 3), gently pull the lobe down.
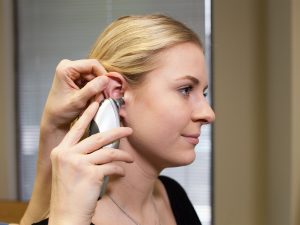
The probe is inserted just inside the opening of the ear. Never force the thermometer into the ear and do not occlude the ear canal. Only the tip of the probe is inserted in the opening – this is important to prevent damage to the ear canal. Activate the device; it will beep within a few seconds to signal it is done. Discard the probe cover in the garbage (without touching the cover) and place the device back into the holder.
Taking a Temporal Temperature: Technique
Temporal artery temperature is not a common method of measurement, but may be used in some agencies; this process involves holding the device and sliding it over the skin of the forehead and then, down over the temporal artery in one motion.
Taking an Axillary Temperature: Technique
Remove the probe from the device and place a probe cover (from the box) on the thermometer without touching the cover with your hands. Ask the patient to raise the arm away from his/her body. Place the thermometer in the patient’s armpit, on bare skin, as high up into the axilla as possible, with the point facing behind the patient. Ask the patient to lower his/her arm and leave the device in place for as long as is indicated by the device manufacturer. Usually, the device beeps in 10–20 seconds. Discard the probe cover in the garbage (without touching the cover) and place the probe back into the device.
Dermal strips can also be placed on the forehead to measure skin temperature, but are not yet widely used, and the accuracy of this method has not yet been verified. Please click on the link below for more information on the Dermal strip.
A video on the different methods used to take a temperature by Nurse RN: https://www.youtube.com/watch?v=nvl1qQfgzuw
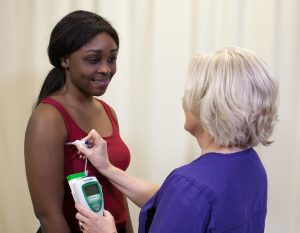
Taking a Non-Contact Temperature Technique
Depending on the type, these thermometers can be held at a short distance from the forehead or temporal area to measure temperature. Alternatively, some handheld thermal scanners that use an infrared camera can be held at a greater distance to screen large masses of people. Please refer to the manufacturer’s suggested reference range for non-contact infrared thermometers and thermal scanners.
Other factors that influence temperature include diurnal rhythm, exercise, stress, menstrual cycle, and pregnancy. The diurnal cycle causes a fluctuation of 1ºC, with temperatures lowest in the early morning and highest in the late afternoon. During exercise, body temperature rises because the body is using energy to power the muscles. Temperature can rise as a result of stress and anxiety, due to stimulation of the sympathetic nervous system and increased secretion of epinephrine and norepinephrine. Body temperature varies throughout a woman’s menstrual cycle due to hormonal fluctuations, rising after ovulation until menstruation by about 0.5–1ºC. Body temperature is slightly elevated during pregnancy as a result of increased metabolism and hormone production such as progesterone.
Table 2.1: Normal Temperature Ranges
| Method
Oral |
Range
35.8-37.3 |
Range
96.6-99.1ºF |
|---|---|---|
| Axillary | 34.8–36.3ºC | 94.6-97.3ºF |
| Tympanic | 36.1–37.9ºC | 96.9-100.2ºF |
| Rectal | 36.8–38.2ºC | 98.2-100.7ºF |
Assessing Pulses:
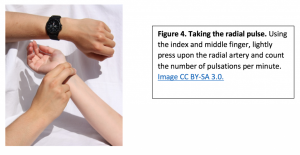
Obtaining the radial pulse:
Use the pads of your first three fingers to gently palpate the radial pulse. The pads of the fingers are placed along the radius bone, which is on the lateral side of the wrist (the thumb side; the bone on the other side of the wrist is the ulnar bone). Place your fingers on the radius bone close to the flexor aspect of the wrist, where the wrist meets the hand and bends. Press down with your fingers until you can best feel the pulsation. Note the rate, rhythm, force, and equality when measuring the radial pulse. If you cannot feel the pulse try adjusting the amount of pressure being applied.
Obtain the Brachial pulse Technique:
The brachial pulse can be located by feeling the bicep tendon in the area of the antecubital fossa. Move the pads of your three fingers medial (about 2 cm) from the tendon and about 2–3 cm above the antecubital fossa to locate the pulse. It can be helpful to hyper-extend the arm in order to accentuate the brachial pulse in order to feel the brachial pulse. Moving fingers across the antecubital area with fairly firm pressure will also assist in locating the best spot to most accurately feel the pulse.
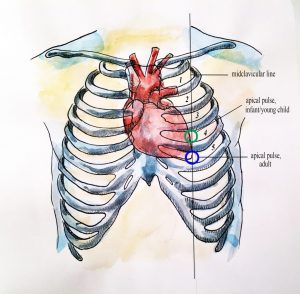
Obtaining the Apical Pulse
The apical pulse is auscultated with a stethoscope over the chest where the heart’s mitral valve is best heard and the Point of Maximum Index is palpated. In infants and young children, the apical pulse is located at the fourth intercostal space at the left midclavicular line. In adults, the apical pulse is located at the fifth intercostal space at the left midclavicular line.
Apical pulse rate is indicated during some assessments, such as when conducting a cardiovascular assessment and when a client is taking certain cardiac medications (e.g., digoxin). Sometimes the apical pulse is auscultated pre and post medication administration. It is also a best practice to assess apical pulse in infants and children up to five years of age because radial pulses are difficult to palpate and count in this population. It is typical to assess apical pulses in children younger than eighteen, particularly in hospital environments. Apical pulses may also be taken in obese people because their peripheral pulses are sometimes difficult to palpate.
Finding the location of the Apical pulse:
Feel the intercostal spaces to accurately locate the apical pulse and obtain a physical landmark. There is a space below the clavicle, called the “Faked space” but the first intercostal space is located below the first rib. another technique is to slide fingers down the manubrium where it meets the sternum: this is called the sternal angle (angle of Louis). The second rib extends out from the sternal angle.
Note: The apical pulse’s location is individualized and is found at the 5th intercostal space which is not always at the nipple line.
Technique to assess the Apical pulse-Palpation and auscultation:
Position the patient in a supine (lying flat) or in a seated position. Physically palpate the intercostal spaces to locate the landmark of the apical pulse.
Ask the female patient to re-position her own breast tissue to auscultate the apical pulse. For example, the patient will gently shift the breast laterally so that the apical pulse landmark is exposed. Alternatively, the healthcare provider can use the ulnar side of the hand to re-position the breast tissue and auscultate the apical pulse. Ensure draping to protect the patient’s privacy.
Either the bell or diaphragm is used to auscultate the patient’s heart rate and rhythm. There is a pediatric-size stethoscope for infants. Typically, apical pulse rate is taken for a full minute to ensure accuracy; this is particularly important in infants and children due to the possible presence of sinus arrhythmia. Upon auscultating the apical pulse, the sounds “lub dup” will be heard– count the double sound as one beat. Count the apical pulse for one minute. Note the rate and rhythm.
Assessing the Carotid Pulse Technique
Ask the patient to sit upright. Locate the carotid artery medial to the sternomastoid muscle (between the muscle and the trachea at the level of the cricoid cartilage, which is in the middle third of the neck). With the pads of your three fingers, gently palpate the carotid artery, one at a time.
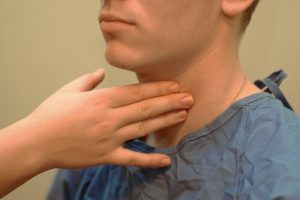
Never palpate the carotid pulses simultaneously as this will reduce and/or compromise cerebral blood flow.
Characteristics of the Pulse
Heart/Pulse Rate
The pulse rate is counted by starting at one, which correlates with the first beat felt by your fingers. Count for thirty seconds if the rhythm is regular (even tempo) and multiply by two to report in beats per minute. Count for one minute if the rhythm is irregular. In children, the pulse is counted for one minute considering that irregularities in rhythm are common.
Heart Rate Ranges
| Age | Heart rate (beats per minute) |
|---|---|
| Newborn to one month | 100–175 |
| One month to two years | 90–160 |
| Age 2–6 years | 70–150 |
| Age 7–11 years | 60–130 |
| Age 12–18 years | 50–110 |
| Adult and older adult | 60–100 |
Pulse Rhythm
The normal pulse rhythm is regular, meaning that the frequency of the pulsation felt by the fingers follows an even tempo with equal intervals between pulsations. If you compare this to music, it involves a constant beat that does not speed up or slow down but stays at the same tempo. Thus, the interval between pulsations is the same. However, sinus arrhythmia is a common condition in children, adolescents, and young adults. Sinus arrhythmia involves an irregular pulse rhythm in which the pulse rate varies with the respiratory cycle: the heart rate increases at inspiration and decreases back to normal upon expiration. The underlying physiology of sinus arrhythmia is that the heart rate increases to compensate for the decreased stroke volume from the heart’s left side upon inspiration.
Note: If a pulse has an irregular rhythm, it is important to determine whether it is regularly irregular (e.g., three regular beats and one missed and this is repeated) or if it is irregularly irregular (e.g., there is no rhythm to the irregularity). Irregularly irregular pulse rhythm is highly specific to atrial fibrillation. Atrial fibrillation is an arrhythmia whereby the atria quiver. This condition can have many consequences including decreased stroke volume and cardiac output, blood clots, stroke, and heart failure.
Pulse Force
The pulse force is the strength of the pulsation felt when palpating the pulse. For example, when you feel a client’s pulse against your fingers, is it gentle? Can you barely feel it? Alternatively, is the pulsation very forceful and bounding into fingertips? The force is important to assess because it reflects the volume of blood, the heart’s functioning and cardiac output, and the arteries’ elastic properties. Remember, stroke volume refers to the volume of blood pumped with each contraction of the heart (i.e., each heartbeat). Thus, pulse force provides an idea of how hard the heart has to work to pump blood out of the heart and through the circulatory system.
Pulse force is recorded using a four-point scale:
- 3+ Full, bounding
- 2+ Normal/strong
- 1+ Weak, diminished, Thready
- 0 Absent/non-palpable
Pulse Equality
Pulse equality refers to whether the pulse force is comparable on both sides of the body. For example, palpate the radial pulse on the right and left wrist at the same time and compare whether the pulse force is equal. Pulse equality is assessed because it provides data about conditions such as arterial obstructions and aortic coarctation. However, the carotid pulses should never be palpated at the same time as this can decrease and/or compromise cerebral blood flow.
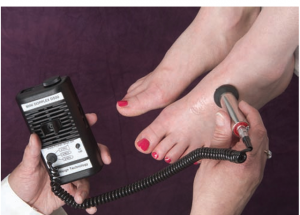
If unable to palpate a pulse then use a doppler.
A Doppler ultrasound device if you are struggling to feel the pulse and are concerned about perfusion into the limbs. This is a handheld device that allows you to hear the whooshing sound of the pulse. The Doppler device is also used following surgery or insertion of a central line to assess blood flow. These devices are most commonly used when assessing peripheral pulses in the lower limbs, such as the dorsalis pedis pulse or the posterior tibial pulse. See Film clip 3.1 for use of a Doppler device. The doppler device is also used to locate the brachial pulse and assess blood pressure in infants.
Respirations
Respiration refers to a person’s breathing and the movement of air into and out of the lungs (OER #2). The respiratory system provides oxygen to body tissues for cellular respiration, removes the waste product carbon dioxide, and helps maintain acid-base balance. Inspiration is the process that causes air to enter the lungs, and expiration is the process that causes air to leave the lungs. A respiratory cycle (or one breath while you are measuring respiratory rate) is one sequence of inspiration and expiration.
Technique: Assessing the respiration rate:
The respiratory rate is counted after taking the pulse rate so that the patient is not aware that you are taking it. Once you have finished counting the pulse, leave your fingers in place and then begin assessing respiration. Observe the chest or abdomen rise and fall. One respiration includes a full respiratory cycle (including both inspiration and expiration). Thus, the rise and the fall of the abdomen or chest is counted as one full breath. Count for 30 seconds if the rhythm is regular or for a full minute if irregular. Report the respiration as breaths per minute (bpm), as well as whether breathing is relaxed, silent, and has a regular rhythm.
Respiration is assessed for quality, rhythm, and rate.
The quality of a person’s breathing is normally relaxed and silent. Healthcare providers assess the use of accessory muscles in the neck and chest and indrawing of intercostal spaces (also referred to as intercostal tugging), which can indicate respiratory distress. Respiratory distress can also cause nasal flaring, and the person often moves into a tripod position. The tripod position involves leaning forward and placing arms/hands and/or upper body on one’s knees or on the bedside table.
Respiration normally has a regular rhythm. A regular rhythm means that the frequency of the respiration follows an even tempo with equal intervals between each respiration.
Respiratory rates vary based on age. The normal resting respiratory rate for adults is 10–20 breaths per minute. Children younger than one year normally have a respiratory rate of 30–60 breaths per minute, but by the age of ten, the normal rate is usually 18–30. By adolescence, the respiratory rate is usually similar to that of adults, 12–18 breaths per minute. The normal respiratory rate for children decreases from birth to adolescence. Respiratory rates often increase slightly over the age of sixty-five.
Respiratory Rate Ranges
| Age | Rate (breaths per minute) |
|---|---|
| Newborn to one month | 30–65 |
| One month to one year | 26–60 |
| 1–10 years | 14–50 |
| 11–18 years | 12–22 |
| Adult and older adult | 10–20 |
Things to consider when assessing the chest and abdomen:
Assess the movement of the chest with adults and the movement of the abdomen with newborns and infants. Adults are normally thoracic breathers (the chest moves) while infants are normally diaphragmatic breathers (the abdomen moves). Some adults are abdominal breathers. Breathing rates are counted for one minute with infants because the respiratory rhythm (tempo) can vary significantly. For example, the breathing rates of infants can speed up and slow down with some short periods of apnea (pauses in breathing).
When assessing respiration, ensure that thick and bulky clothing is removed so you can clearly see the rise and fall of the chest or abdomen. Although respiratory rates are best counted at rest, sometimes this is not possible (e.g., in an emergency situation and with a child who is crying). In this case, document the situation.
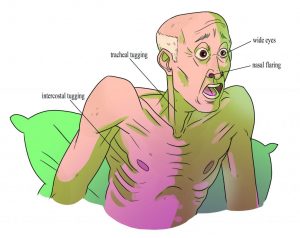
While assessing respirations, it is important to note signs of respiratory distress, which can include loud breathing, nasal flaring, and intercostal retractions. See the figure below for signs of respiratory distress. These signs require further assessment and intervention.
Why is Blood Pressure Measured?
- A person’s blood pressure provides insight into the functioning of the body
- Healthy body functioning is influenced by healthy blood pressure
- The findings can provide information about the integrity of arteries and heart functioning, which can lead the healthcare provider to conduct additional assessments
- High blood pressure can cause the arteries to become weak and damaged and cause the heart to become weak and enlarged
- Low blood pressure can decrease perfusion of nutrients and oxygen to the body’s cells, influencing the ability to function and potentially to cellular death
- Chronic high blood pressure can contribute to conditions such as vascular disease, myocardial infarction, cerebral stroke, kidney disease, and dement
Blood pressure is reported in mm Hg (millimeters of mercury) and is documented as a fraction. The first sound heard is the systolic number and it is the top number of the fraction and the last sound heard is the diastolic number and this is the bottom number of the fraction.
Estimated Blood Pressure Ranges (mm Hg)
| Age | Systolic Range | Diastolic Range |
|---|---|---|
| Newborn to 6 months | 45–90 | 30–65 |
| 6 months to 2 years | 80–100 | 40–70 |
| Children (2–13 years) | 80–120 | 40–80 |
| Adolescent (14–18 years) | 90–120 | 50–80 |
| Adult (19–40 years) | 95–135 | 60–80 |
| Adult (41–60 years) | 110–145 | 70–90 |
| Older adult (61 and older) | 95–145 | 70–90 |
The average blood pressure for an adult is sometimes noted as 120/80 mm Hg. However, this is only an average and the healthcare provider needs to consider acceptable ranges for individual clients. For example, in adults, normal blood pressure can range from 95–145/60–90 mm Hg. The healthcare provider considers the patient’s baseline blood pressure and the patient’s current health state in conjunction with subjective data and other objective data. For example, a blood pressure of 90/50 mm Hg may be normal for a healthy, asymptomatic 20-year-old adult.
Factors that influence blood pressure include age, sex, ethnicity, weight, exercise, emotions/stress, pregnancy, and diurnal rhythm as well as medication use and disease processes.
- The general pattern is that blood pressure rises with age, so normal variations tend to be higher for older adults.
- Blood pressure is similar in childhood for males and females. After puberty, females have a lower blood pressure than males, whereas after menopause females have a higher blood pressure than males.
- Research has demonstrated that ethnicity may be a risk factor for hypertension. and this heightened risk is multifaceted and may include a genetic factor but social economics plays a great part in the increased risk.
- The diurnal cycle influences blood pressure to be lower in the morning and increase throughout the day until early evening. Try it out: take your blood pressure when you wake up in the morning and then again in the late afternoon, and note the difference. This is one reason why healthcare providers document the time a patient’s blood pressure is taken.
- Blood pressure can be higher in people who are obese because the heart has to work harder to perfuse the body’s tissues.
- The sympathetic nervous system is stimulated by exercise, stress, anxiety, pain, anger, and fear, which increases blood pressure. Blood pressure returns to baseline within five minutes of rest following activity.
- Blood pressure varies throughout the duration of pregnancy. It decreases about halfway through the first trimester until mid-pregnancy due to progesterone effects that relax the walls of blood vessels, causing decreased peripheral vascular resistance. It returns to pre-pregnancy values toward the end of pregnancy.
How is Blood Pressure Measured?
Blood pressure is measured in many ways including manual/auscultatory, automatic/electronic, cellular phone applications, and arterial catheters. Whatever method used, blood pressure must be measured using validated equipment. It has been found that blood pressure is often not measured accurately in clinical practice, particularly when using the auscultatory/manual method. It is important to ensure the correct technique to obtain an accurate measurement.
Blood pressure is generally taken in a sitting or supine position with the bare arm at heart level (OER #1). Certain health states prevent some patients from sitting, such as patients who are critically ill, unstable, or postoperative. Therefore, the patient’s position while the blood pressure is obtained is documented (e.g., sitting, supine, standing). If sitting, the feet are placed flat on the floor with the back resting comfortably against a chair. The nurse checks to ensure that the patient’s legs are not crossed because this can increase blood pressure. The patient sits resting for five minutes before you take the blood pressure. This waiting period is not feasible when the patient’s condition is deteriorating or a STAT blood pressure is required. Do not ask the patient to hold any of the equipment during the blood pressure measurement.
Cuff Types and Sizes
Cuff Sizing
| Cuff Sizing |
|---|
| The width of the cuff is 40% of the person’s arm circumference |
| The length of the cuff’s bladder is 80–100% of the person’s arm circumference |
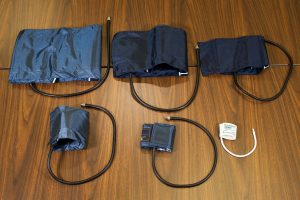
Manual and automatic blood pressure measurement involves using a blood pressure cuff with a sphygmomanometer. Many cuff sizes are available to fit newborns, children, adults, people with small and larger arms, and people with cone-shaped arms. The cuff is typically wrapped around the upper arm. However, there is also a cuff that can be placed on the thigh when the arm is not feasible. See the picture of varying blood pressure cuff sizes. Wrist devices can be used for blood pressure estimation when clients have a large upper arm circumference (Nerenberg, 2018). When taking the measurement, make sure that the arm and wrist are supported at heart level (Nerenberg, 2018).
Before placing the blood pressure cuff on the client’s arm, palpate the brachial artery using three fingers (not your thumb) just above the antecubital fossa medially. To do this, palpate the bicep tendon at the antecubital fossa. Move 2 cm medially from the tendon and 2–3 cm above the antecubital fossa. Press firmly to feel the brachial pulse. Wrap the blood pressure cuff securely and evenly around the patient’s upper, bare arm (not over clothing) with the cuff’s artery marker aligned with the brachial artery and about 3cm above the antecubital fossa.
Reflection:
Take blood pressure in both arms when you measure a patient’s blood pressure for the first time. A small difference in blood pressure between the arms is often normal. Differences of greater than 10 mm Hg systolic between the arms are investigated further because this finding has been associated with vascular disease and mortality outcomes. Measure subsequent blood pressures in the arm with the higher blood pressure.
Thigh blood pressure is indicated when blood pressure cannot be taken on the arm, such as when patients have bilateral amputation or burns. Thigh blood pressure is also done on children and adolescents with unusually high blood pressure in the arm and to compare differences between upper and lower extremities. In such cases, coarctation of the aorta (a congenital narrowing of the aorta) is possible. The thigh systolic blood pressure is 10–40 mm Hg higher than the arm systolic blood pressure, while the thigh diastolic blood pressure is approximately the same as the arm. To obtain thigh blood pressure, the client must be in the prone position. Place the cuff around the bottom third of the client’s thigh. The cuff’s artery line is aligned with the popliteal artery. The popliteal artery can be located in the popliteal fossa. Palpate the medial tendon and move the pads of your three fingers lateral to the tendon. Press your fingers into the femur or tibia bone. Continue with the same process as noted above in terms of taking blood pressure.
Manual Blood Pressure Measurement
A healthcare provider uses a stethoscope and a blood pressure cuff with a sphygmomanometer to measure blood pressure manually. The stethoscope is used to listen to the blood pressure sounds, which are called Korotkoff sounds.
Korotkoff Sounds:
Korotkoff sounds are the sounds of blood flow through the artery as you are listening to blood pressure. Korotkoff sounds are not the same thing as the heartbeat or the pulse. They disappear as the cuff is inflated and reappear as the cuff is deflated. They also cannot be heard when the cuff is fully deflated because unobstructed and healthy blood flow is silent. When deflating the cuff, the first Korotkoff sound heard is called the systolic sound and the point in which the Korotkoff sounds are no longer heard is diastolic sound (Hypertension Canada, 2020). In rare cases, the Korotkoff sounds continue to 0 mm Hg. In this case, the diastolic pressure should be measured when the Korotkoff sounds become muffled (Hypertension Canada, 2020).
Stethoscope Usage and Korotkoff sounds
The stethoscope is used on bare skin so that a client’s clothing does not affect the sounds. The stethoscope does not make sounds louder; it simply blocks out extraneous noises so you can better hear the Korotkoff sounds. These sounds are heard through a stethoscope applied over the brachial artery when the blood pressure cuff is deflating. You will not hear anything when you first place the stethoscope over the brachial artery, because unobstructed blood flow is silent. The Korotkoff sounds appear after you inflate the cuff (which compresses the artery/blood flow) and then begin to deflate the cuff. The Korotkoff sounds are the result of the turbulent blood caused by the inflated cuff compressing the artery and oscillations of the arterial wall when the heart beats during cuff deflation.
Here are a few tips:
- Use a high-quality stethoscope with durable, thick tubing. Avoid stethoscopes with long tubing because this can distort sounds.
- Ensure quiet surroundings so that you can better hear the Korotkoff sounds.
- Make sure that the slope of the stethoscope earpieces point forward or toward your nose.
- Use a stethoscope that has both bell and diaphragm capacity.
- Cleanse the stethoscope prior to use including the earpieces and the bell and diaphragm.
- The bell of the stethoscope is suggested because it is used for low-pitched sounds like blood pressure. However, some healthcare providers use the diaphragm for several reasons: that is how they learned to take blood pressure; they believe this helps them hear the Korotkoff sounds better, and the diaphragm covers a larger surface area than the bell.
- Hold the bell lightly against the skin with a complete seal or hold the diaphragm firmly against the skin with a complete seal.
- You must ensure that the bell or diaphragm is open before using.
![]()

Blood Pressure Measurement Techniques
Two-step technique
First step: Determining maximum pressure inflation
Palpate the radial or brachial artery, inflate the blood pressure cuff until the pulse is obliterated, and then continue to inflate 30 mm Hg more. Note this number – it is considered the maximum pressure inflation. Next, deflate the cuff quickly.
Second step: Measure blood pressure:
Place the bell of the cleansed stethoscope over the brachial artery using a light touch to create a complete seal. Then inflate the cuff to the maximum pressure inflation number. Once the maximum inflation number is obtained open the valve slightly to deflate the cuff slowly and evenly at about 2 mm Hg per second.
Deflation rate of sphygmomanometer-Video: https://youtu.be/QbGPzUluT5c
Note the points at which you hear the first appearance of Korotkoff sounds (systolic blood pressure) and the point at which the Korotkoff sounds go silent (diastolic blood pressure) (Hypertension Canada, 2020). These sounds are called Korotkoff sounds and vary in quality from tapping, swooshing, muffled sounds, and silence. The pressure at which the first Korotkoff sound is noted signifies the systolic pressure, while the pressure at which the Korotkoff sounds are no longer heard marks the diastolic pressure.
One-Step technique:
Palpate the radial or brachial artery, inflate the blood pressure cuff until the pulse is obliterated, and then continue to inflate 20 to 30 mm Hg more. Place the bell of the cleansed stethoscope over the brachial artery using a light touch with a complete seal. Open the valve slightly. Deflate the cuff slowly and evenly at about 2 mm Hg per second. Note the points at which you hear the first Korotkoff sound (systolic blood pressure) and the last Korotkoff sound (diastolic blood pressure) before it goes silent. These sounds are called Korotkoff sounds and vary in quality from tapping, swooshing, muffled sounds, and silence. The first Korotkoff sound is the systolic pressure, and the diastolic pressure is the last Korotkoff sound before the sounds go silent.
Korotkoff Sounds:
Korotkoff sounds are the sounds of blood flow through the artery as you are listening to blood pressure. Korotkoff sounds are not the same thing as the heartbeat or the pulse. They disappear as the cuff is inflated and reappear as the cuff is deflated. They also cannot be heard when the cuff is fully deflated because unobstructed and healthy blood flow is silent. When deflating the cuff, the first Korotkoff sound is systolic and the point in which the Korotkoff sounds are no longer heard is diastolic (Hypertension Canada, 2020). In rare cases, the Korotkoff sounds continue to 0 mm Hg. In this case, the diastolic pressure should be measured when the Korotkoff sounds become muffled (Hypertension Canada, 2020).
Manual blood pressure is reported in even numbers. Healthcare providers always measure blood pressure with a pulse because these vital signs are closely related and data from both are needed to make accurate and informed clinical decisions.
What should be done if the Korotkoff Sounds are not heard?
- Use your bell and make full contact with skin
- Make sure the bell is positioned over the brachial artery
- Ensure the room is quiet
- Concentrate on expected sounds (swooshing, tapping, muffled sounds)
- Try different earbuds (hard or soft) on your stethoscope
Common Errors When Taking Blood Pressure
Many errors must be avoided when measuring blood pressure. Failure to determine maximum pressure inflation can produce a falsely low systolic reading. Deflating the cuff too slowly can produce a falsely high diastolic, and deflating the cuff too quickly can produce a falsely low systolic or falsely high diastolic reading. Inaccurate cuff sizes for the patient’s arm size and shape can result in measurement errors. A cuff that is too narrow can produce a falsely high blood pressure, whereas a cuff that is too loose can produce a falsely low blood pressure.
What is Oxygen Saturation?
Oxygen saturation refers to the percentage of hemoglobin molecules saturated with oxygen. Hemoglobin molecules can each carry four oxygen molecules; the oxygen binds or attaches to hemoglobin molecules. Oxygen saturation provides information about how much oxygen is being carried by hemoglobin molecules, verses how many hemoglobin molecules are not carrying oxygen.
Why is Oxygen Saturation Measured?
Healthcare providers measure oxygen saturation because it provides information about a patient’s state of health. The body’s tissues and organs require oxygen for metabolism, and oxygen saturation can reveal whether there is sufficient oxygen in the blood or whether the patient is in a state called hypoxemia (insufficient oxygen in the blood).
Pulse Oxygenation
Oxygen saturation levels can influence clinical decisions about whether the patient is receiving sufficient oxygen and/or requires supplemental oxygen. Oxygen saturation levels are also monitored during and after surgeries and treatments and to assess a patient’s capacity for increased activity. Oxygen saturation can be measured using a pulse oximetry device, which is a non-invasive method to measure arterial oxygen saturation level. The sensor is attached using various devices. One is a spring-loaded clip attached to a finger or toe. However, this clip is too large for newborns and young children, so for this population, the sensor is taped to the ear, a finger, or a toe. The clip to the finger and toe is used most often for intermittent measurements while the taped-on devices are also used for continuous monitoring for critically ill patients.
In practice, the SpO2 range of 92–100% is generally acceptable for most patients.
Older adults typically have lower oxygen saturation levels than younger adults. For example, someone older than 70 years of age may have an oxygen saturation level of about 95%, which is an acceptable level.
It is important to note that the oxygen saturation level varies considerably based on a person’s state of health. Thus, it is important to understand both baseline readings and underlying physiology associated with certain conditions to interpret oxygen saturation levels and changes in these levels.
- People who are obese and/or have conditions such as lung and cardiovascular diseases, emphysema, chronic obstructive pulmonary disease, congenital heart disease, and sleep apnea tend to have lower oxygen saturation levels.
- Smoking can influence the accuracy of pulse oximetry in which the SpO2 is low or falsely high depending on whether hypercapnia is present. With hypercapnia, it is difficult for the pulse oximeter to differentiate oxygen in the blood from carbon monoxide (caused by smoking).
- Oxygen saturation levels may decrease slightly when a person is talking.
- Oxygen saturation may remain normal (e.g., 97% and higher) for people with anemia. However, this may not indicate adequate oxygenation because there are less hemoglobin to carry an adequate supply of oxygen for people who have anemia. The inadequate supply of oxygen may be more prominent during activity for people with anemia.
- Falsely low oxygen saturation levels may be associated with hypothermia, decreased peripheral perfusion, and cold extremities. In these cases, an ear lobe pulse oximeter device or arterial blood gases would provide a more accurate oxygen saturation level.
The healthcare provider cannot have confidence in measurement accuracy when the radial pulse does not coincide with the pulse displayed on the oximeter. It is also important to note that the pulse oximeter device cannot provide an accurate reading when oxygen saturation is below 75% (Shah & Shelley, 2013). Oxygen saturation levels in the 70s indicate that a patient is decompensating and immediate intervention is required. Further, interventions will include a respiratory assessment to ensure that the patient is not in respiratory distress, and if needed arterial blood gas sample will be obtained.
The significance of the oxygen saturation level is interpreted within the context of the patient’s baseline measurements, other data including vital signs and other objective and subjective findings, and the client’s overall health and wellness state.
Reflection:
A pulse oximeter reading reflects arterial oxygen saturation levels, as opposed to venous oxygen saturation levels, because the device only measures light absorption of pulsatile flow: the ‘p’ in Sp02 refers to pulse or pulsatile flow. If pulsatile flow is limited or obstructed, an oxygen saturation level will not be accurate. For example, the compression of a blood pressure cuff will obliterate the pulsatile flow so blood pressure and pulse oximetry should not be taken simultaneously on the same limb.
One of the most important assessment tools is vital signs. Vital signs vary with age. Here is a table that demonstrates how age affects vital signs until adulthood. Please note that the ranges listed here may vary slightly from another source/text or clinical site(s) vital sign computerized or paper form parameters.
Pain Assessment
What is Pain:
Pain is a symptom of being hurt or sick. It is a bad physical and emotional and emotional sensation and starts when a part of the body has been injured. Then two responses are triggered at the same time. The physical response entails the nerves in the injured part of the body send messages about the injury to the brain and the emotional response to the injury is expressed. The message that the nerve sends to the brain is called nociception. What is experienced because of the nociception is pain.
The International Association for the Study of Pain’s widely used definition states: “Pain is an unpleasant sensory and emotional experience associated with actual or potential tissue damage or described in terms of such damage.”
Types of Pain:
- Superficial/Cutaneous pain is from damage to the skin. This is the pain a person feels when their wrist is cut with a knife.
- Visceral pain is from damage to the organs inside the body – like the stomach, kidney, and heart. This is the pain a person feels when they have an ulcer.
- Somatic pain is from muscles, bones, and joints. This is the pain a person feels when they sprain (twist) a joint like the ankle.
- Neuropathic pain is from nerves that do not work correctly and not from an injury.
- Referred pain (also reflective pain) is pain perceived at a location other than the site of the painful stimulus.
- Phantom pain: Pan in a part of the body that has been removed.
Categories of Pain:
Acute pain: “results from disease, inflammation, or injury to tissues. This type of pain generally comes on suddenly, for example, after trauma or surgery, and may be accompanied by anxiety or emotional distress. The cause of acute pain is normally identified, diagnosed, and treated with a resolution of the pain within a small period of time normally less than three months.
Chronic Pain: “is widely believed to represent disease itself. It can be made much worse by environmental and psychological factors. Chronic pain persists over a longer period of time than acute pain and is resistant to most medical treatments. Pain continues after 3 months and interferes with functionality and overall life.
Pain Assessment:
“Pain is whatever the experiencing person says it is, existing whenever the experiencing person says it does” (McCaffery, 1968, cited in Rosdahl & Kowalski, 2007, p. 704). Pain is a subjective experience, and self-report of pain is the most reliable indicator of a patient’s experience. Determining if pain is present an important component of a physical assessment.
Pain assessment is an ongoing process rather than a single event. A more comprehensive and focused assessment should be performed when someone’s pain changes notably from previous findings, because sudden changes may indicate an underlying pathological process (Jarvis, Browne, MacDonald-Jenkins, & Luctkar-Flude, 2014).
Always assess pain at the beginning of a physical health assessment to determine the patient’s comfort level and the potential need for pain comfort measures. Pain assessment tools and scaled are used to provide the best care possible for the patient.
Asking a patient to rate the severity of their pain on a scale from 0 to 10, with “0” being no pain and “10” being the worst pain imaginable is a common question used to screen patients for pain. However, according to The Joint Commission requirements described earlier, this question can be used to initially screen a patient for pain, but a thorough pain assessment is required. Additionally, the patient’s comfort-function goal must be assessed. The comfort-function goal provides the basis for the patient’s individualized pain treatment plan and is used to evaluate the effectiveness of interventions.
Pain Tools: Are used to guide the assessment questions and obtain data that will assist the nurse in creating a customized plan of care for the patient that effectively addresses the patient’s need for comfort. Three commonly used pain assessment tools are the PQRSTU, OLDCARTES, and COLDSPA.
The “PQRSTU,” “OLDCARTES,” or “COLDSPA” mnemonics are helpful in remembering a standardized set of questions used to gather additional data about a patient’s pain. While interviewing a patient about pain, use open-ended questions to allow the patient to elaborate on information that further improves your understanding of their concerns. If their answers do not seem to align, continue to ask focused questions to clarify information. For example, if a patient states that “the pain is tolerable” but also rates the pain as a “7” on a 0-10 pain scale, these answers do not align, and the nurse should continue to use follow-up questions using the PQRSTU framework. Upon further questioning, the patient explains they rate the pain as a “7” in their knee when participating in physical therapy exercises but currently feels the pain is tolerable while resting in bed. This additional information assists the nurse to customize interventions for effective treatment with reduced potential for overmedication with associated side effects.
Sample PQRSTU Focused Questions for Pain
| PQRSTU | Questions Related to Pain |
|---|---|
| Provocation/Palliation | What makes your pain worse? What makes your pain feel better? |
| Quality | What does the pain feel like? Note: You can provide suggestions for pain characteristics such as “aching,” “stabbing,” or “burning.” |
| Region | Where exactly do you feel the pain? Does it move around or radiate elsewhere? Note: Instruct the patient to point to the pain location. |
| Severity | How would you rate your pain on a scale of 0 to 10, with “0” being no pain and “10” being the worst pain you’ve ever experienced? |
| Timing/Treatment | When did the pain start? What were you doing when the pain started?
Is the pain constant or does it come and go? If the pain is intermittent, when does it occur? How long does the pain last? Have you taken anything to help relieve the pain? |
| Understanding | What do you think is causing the pain? |
An alternative mnemonic to use when assessing pain is “OLDCARTES.”
- Onset: When did the pain start? How long does it last?
- Location: Where is the pain?
- Duration: How long has the pain been going on? How long does an episode last?
- Characteristics: What does the pain feel like? Can the pain be described in terms such as stabbing, gnawing, sharp, dull, aching, piercing, or crushing?
- Aggravating & Alleviating factors: What brings on the pain? or What relieves the pain? What makes the pain worse? or what makes the pain better?
- Radiating/Related Symptoms: Does the pain travel to another area or the body, or does it stay in one place? Or Do you have any other symptoms during the pain?
- Treatment: What has been done to make the pain better and has it been helpful? Examples include medication, position change, rest, and application of hot or cold.
- Effect: What is the effect of the pain on participating in your daily life activities?
- Severity: Rate your pain from 0 to 10.
A third mnemonic used is “COLDSPA.”
- C: Character
- O: Onset
- L: Location
- D: Duration
- S: Severity
- P: Pattern
- A: Associated Factors
Pain Scales are used to determine the severity of pain the patient is experiencing. In order to obtain the best pain rating for each patient different scales are available. Scale can be age and or cognition dependent.
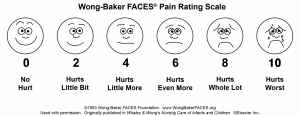
FACES SCALE
The FACES scale is a visual tool for assessing pain with children and others who cannot quantify the severity of their pain on a scale of 0 to 10. See Figure 11.5[2] for the FACES Pain Rating Scale. To use this scale, use the following evidence-based instructions. Explain to the patient that each face represents a person who has no pain (hurt), some pain, or a lot of pain. “Face 0 doesn’t hurt at all. Face 2 hurts just a little. Face 4 hurts a little more. Face 6 hurts even more. Face 8 hurts a whole lot. Face 10 hurts as much as you can imagine, although you don’t have to be crying to have this worst pain.” Ask the person to choose the face that best represents the pain they are feeling.[3]
FLACC SCALE
The FLACC scale (i.e., the Face, Legs, Activity, Cry, Consolability scale) is a measurement used to assess pain for children between the ages of 2 months and 7 years or individuals who are unable to verbally communicate their pain. The scale has five criteria, which are each assigned a score of 0, 1, or 2. The scale is scored in a range of 0–10 with “0” representing no pain.[4] See the table below for the FLACC scale.
| criteria | Score 0 | Score 1 | Score 2 |
|---|---|---|---|
| Face | No particular expression or smile | Occasional grimace or frown, withdrawn, or uninterested | Frequent to constant quivering chin; and a clenched jaw |
| Legs | Normal position or relaxed | Uneasy, restless, or tense | Kicking or legs were drawn up |
| Activity | Lying quietly, normal position, and moves easily | Squirming, shifting, back and forth, or tense | Arched, rigid, or jerking |
| Cry | No cry (awake or asleep) | Moans or whimpers or occasional complaint | Crying steadily, screams or sobs, or frequent complaints |
| Consolability | Content and relaxed | Reassured by occasional touching, hugging, or being talked to; distractible | Difficult to console or comfort |
COMFORT BEHAVIORAL SCALE
The COMFORT Behavioral Scale is a behavioral-observation tool validated for use in children of all ages who are receiving mechanical ventilation. Eight physiological and behavioral indicators are scored on a scale of 1 to 5 to assess pain and sedation.
PAIN ASSESSMENT IN ADVANCED DEMENTIA (PAINAD) SCALE
The Pain Assessment in Advanced Dementia (PAINAD) Scale is a simple, valid, and reliable instrument for assessing pain in noncommunicative patients with advanced dementia. See Table 11.3c for the items included on the scale. Each item is scored from 0-2, When totaled, the score can range from 0 (no pain) to 10 (severe pain).
Table The PAINAD Scale
| Item | 0 | 1 | 2 |
| Breathing independent of vocalization | Normal | Occasional labored breathing. Short period of hyperventilation. | Noisy labored breathing. Long period of hyperventilation. Cheyne-Stokes respirations. |
| Negative vocalization | None | Occasional moan or groan. Low-level speech with a negative or disapproving quality. | Repeated troubled calling out. Loud moaning or groaning. Crying. |
| Facial Expression | Smiling or inexpressive | Sad. Frightened. Frown. | Facial grimacing. |
| Body language | Relaxed | Tense. Distressed pacing. Fidgeting. | Rigid. Fists clenched. Knees pulled up. Pulling or pushing away. Striking out. |
| Consolability | No need to console | Distracted or reassured by voice or touch. | Unable to console, distract, or reassure. |
Comfort-function goals encourage the patient to establish their level of comfort needed to achieve functional goals based on their current health status. For example, one patient may be comfortable ambulating after surgery and their pain level is 3 on a 0-to-10 pain intensity rating scale, whereas another patient desires a pain level of 0 on a 0-to-10 scale in order to feel comfortable ambulating. To properly establish a patient’s comfort-function goal, nurses must first describe the essential activities of recovery and explain the link between pain control and positive outcomes.
If a patient’s pain score exceeds their comfort-function goal, nurses must implement an intervention and follow up within 1 hour to ensure that the intervention was successful. Using the previous example, if a patient had established a comfort-function goal of 3 to ambulate and the current pain rating was 6, the nurse would provide appropriate interventions, such as medication, application of cold packs, or relaxation measures. Documentation of the comfort-function goal, pain level, interventions, and follow-up are key to effective, individualized pain management.
V. Sample Documentation:
A sample of notes for Vital Signs and Pain
Sample Documentation for Vital Signs:
Mr. Jones is a 39-year-old male who was admitted to the unit S/P appendectomy three hours ago. Upon admission, his vital signs were T: 99℉, HR: 98 bpm, R: 15 bpm, BP: 110/50 and pulse ox: 99% on room air. The patient was given an incentive spirometer with teaching to use ten times an hour but stated he will use it when he is aware even after further teaching. Vital signs now at 1600 are T 101℉, HR 110, R: 14, BP: 108/50, and pulse ox of 95%. Nurse and Respiratory Therapist reinforced teaching and patient out of bed to chair and using incentive spirometer as order. The health care provider is aware of changes in vital signs and will come up to check on patients later.
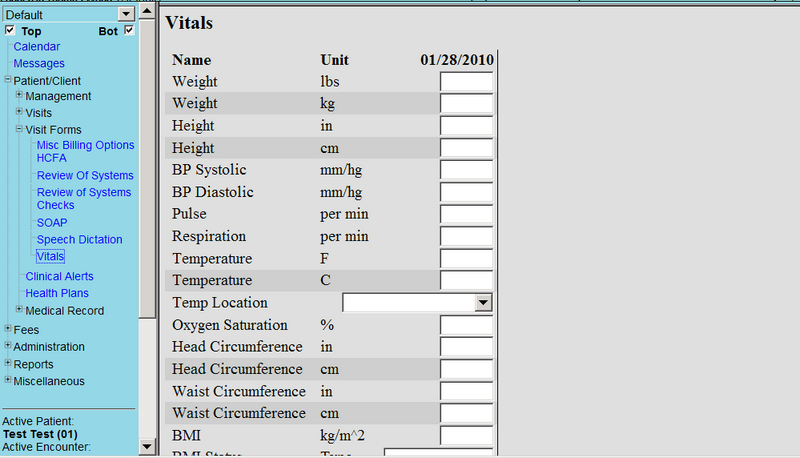
An example of the Electronic Health Record page for Vital Signs
Sample Documentation for pain:
Mrs. Jamison was admitted with acute pain related to kidney stones and is receiving Morphine via PCA pump. At 1400, her blood pressure was elevated at 150/90 and her heart rate elevated at 120. She reported pain as an “8 out of 10.” She was visibly grimacing and audibly moaning when repositioned in bed. Dr. Smith was notified at 1400 and a new prescription was received. Ketorolac 30 mg IV was administered at 1415. At 1515, the patient stated her pain had decreased to a “3 out of 10” level and this level was “satisfactory.” Her blood pressure also decreased to 135/76 and her heart rate decreased to 88.
Evaluation:
Within one hour of administration of Ketorolac, Mrs. Jamison verbalized pain reduction to her reported satisfactory level of “3,” and her blood pressure and heart rate decreased to her baseline levels. SMART outcomes were “met.”
VI: Related Laboratory and Diagnostic Procedures/Findings
Laboratory values and Diagnostic tests are injury and disease-specific in acute pain. When acute pain becomes chronic pain the pain is managed and is specific to what initially caused the pain and signs and symptoms the patient is identifying.
A more detailed overview of pain control and the opioid crisis is discuss in the article: A Brief History of the Opioid Epidemic and Strategies for Pain Medicine. Please click this link:https://www.ncbi.nlm.nih.gov/pmc/articles/PMC5993682/
VII: Learning Activity
VIII. Attributions and References
Citations and Attributions:
Lapum, J.L et al Vital Sign Measurement Across the Lifespan. eCampusOntario. http://solr.bccampus.ca:8001/bcc/file/feacda80-4fc1-40a5-b713-d6be6a73abe4/1/Vital-Sign-Measurement-Across-the-Lifespan-1st-Canadian-edition-1523549109.html
Pain Assessment by British Columbia Institute of Technology (BCIT) is licensed under a Creative Commons Attribution 4.0 International License,
Nursing: Respiratory Rate, Pulse, Blood Pressure, Temperature, Pain, Oxygen Saturation. https://www.youtube.com/watch?v=gUWJ-6nL5-8
Neurosci, F., Developing Brain Vital Signs: Initial Framework for Monitoring Brain Function Changes Over Time Frontiers in Neuroscience May 12, 2016, Retrieved: July 24, 2021. https://www.frontiersin.org/articles/10.3389/fnins.2016.00211/full#:~:text=and%2For%20dementia.-,Introduction,such%20vital%20signs%20could%20play.
Doyle, G., R., and McCutcheon, J., A., Clinical Procedures for safer Patient Care. 2.3 Vital Signs Retrieved: July 24, 2021, https://opentextbc.ca/clinicalskills/chapter/vital-signs/
Vital Signs measurement Across the Liversan-1st Canadian Edition Ryerson Unversity. Retrieved: July 24, 2021. https://pressbooks.library.ryerson.ca/vitalsign/chapter/general-points-to-consider-in-vital-sign-measurement/
A mixed Course-Based Research Approach to Human Physiology by Iowa State University. Body Temperature Homeostasis cold Pressor Test. Retrieved July 24, 2021, https://iastate.pressbooks.pub/curehumanphysiology/chapter/body-temperature-homeostasis/
Figure 8: Human body areas for heart rate and blood pressure by researchgate.net Retrieved: July 24, 2021, https://www.researchgate.net/figure/adapted-48-Human-body-areas-for-heart-rate-and-blood-pressure-measurement-In-a-are_fig4_349538708 Creative Commons Attribution 4.0 International
Anatomy and Physiology II Module3: The Cardiovascular System: The Heart Retrieved: July 24, 2021, https://courses.lumenlearning.com/suny-ap2/chapter/cardiac-physiology/
Anatomy and Physiology Chapter 12: The Respiratory System. The Process of Breathing. Retrieved: July 24, 2021, https://courses.lumenlearning.com/nemcc-ap/chapter/the-process-of-breathing/
File: 2327 Respiratory Centers of the Brain jpg-Wikimedia Commons. Retrieved: July 24, 2021. https://commons.wikimedia.org/wiki/File:2327_Respiratory_Centers_of_the_Brain.jp
Biology 2E 213. Blood Flow and Blood Pressure Regulation Retrieved: July 24, 2021, https://opentextbc.ca/biology2eopenstax/chapter/blood-flow-and-blood-pressure-regulation/
Cerebral autoregulation-Wikipedia. Retrieved 17:57 July 26, 2021 https://en.wikipedia.org/wiki/Cerebral_autoregulation
Vital sign Measurement Across The Lifespan-1st Canadian Edition Chapter 4: Oxygen Saturation by Ryerson University. Retrieved: July 24, 2021. https://pressbooks.library.ryerson.ca/vitalsign/chapter/why-is-pulse-oximetry-used/
Vital Sign Measurement Across the Lifespan – 1st Canadian edition Chapter 2: Temperature by TorontoMu.Ca. Retrieved November 23rd 2024. https://pressbooks.library.torontomu.ca/vitalsign/chapter/chapter-2-temperature/
File: Pulse Oximetry. png-Wikimedia Commons. Retrieved: July 24, 2021, https://commons.wikimedia.org/wiki/Pulse_oximeter#/media/File:Saturometre_2.jpg
File: Taking a rectal temperature. WikiHow to do anything. Retrieved: 21:10 July 26, 2021, https://youtu.be/VJrLHePNDQ4
Nursing Skills 1.3 Vital Signs Open Resources for NURSing (OPEN RN) Wisconsin Technical College System. Retrieved: July 24, 2021, https://wtcs.pressbooks.pub/nursingskills/chapter/1-3-vital-signs/
A mixed Course-Based Research Approach to Human Physiology. Clinical Techniques: Whitmer, K.,H. Assessment of Vital Signs. Week 1 Laboratory Background and methods. Digital Thermometer. Retrieved: 01:55 July 24, 2021 https://iastate.pressbooks.pub/curehumanphysiology/chapter/week-1-laboratory-vital-signs/
How to use a baby Thermoter, Temporal Thermometer Taking a forehead Temperature Retrieved: 02:12 July 24, 2021, https://www.wikihow.health/Use-a-Baby-Thermometer
How to Take Your Child’s Temperature HealthyChildren.Org Retrieved: 02:12 July 24, 2021, https://www.healthychildren.org/English/health-issues/conditions/fever/Pages/How-to-Take-a-Childs-Temperature.aspx
Taking a Tympanic temperature by Expert in my pocket Retrieved: 02:12 July 24, 2021, https://youtu.be/W3ygP86FpOM
Vital Sign Measurement Across the Lifespan-1st Canadian Edition by Open Library Retrieved: 02:12 July 24, 2021, https://ecampusontario.pressbooks.pub/vitalsign/chapter/methods-of-measurement/
Carotid Pulse Palpation by Appropedia Retrieved 04:11 July 25, 2021 https://youtu.be/oJNhT-lLJ1g
Forehead Thermometer for Adults KKmier No Contact Infrared Forehead Thermometer High Precision LCD REtrieved 04:27 July 24, 2021 https://youtu.be/F-nWY__n2XM
Part of this content was adapted from OER #1 (as noted in brackets above):
© 2015 British Columbia Institute of Technology (BCIT). Clinical Procedures for Safer Patient Care by Glynda Rees Doyle and Jodie Anita McCutcheon, British Columbia Institute of Technology. Licensed under a Creative Commons Attribution 4.0 International License, except where otherwise noted. Download this book for free at http://open.bccampus.ca
Vimeo Medical Care Development, Korotkoff Blood Pressure Sights and sounds Retrieved 10:01 July 25, 2021 https://vimeo.com/8068713
Best Stethoscope, the Parts of a Stethoscope, Retrieved 20:59 July 25, 2021, https://beststethoscopeguide.com/parts-of-a-stethoscope/
Korotkoff Sounds Annotated Video by Haydn Allbutt May 18, 2014, Retrieved 10:14 July 25, 2021, https://youtu.be/VJrLHePNDQ4
Part of this content was adapted from OER #2 (as noted in brackets above):
© Apr 10, 2017 OpenStax Anatomy and Physiology. Textbook content produced by OpenStax Anatomy and Physiology is licensed under a Creative Commons Attribution License 4.0 license. Download for free at http://cnx.org/contents/7c42370b-c3ad-48ac-9620-d15367b882c6@12
Pain simple English Wikiedia Retrieved 12:27 July 26, 2021 https://simple.wikipedia.org/wiki/Pain#Chronic_pain
Gibson, M., C., Pain classification WikiDoc, Retrieved 12:27 July 26, 2021, https://www.wikidoc.org/index.php/Pain_classification
CLINICAL PROCEDURES FOR SAFER PATIENT CARE Chapter 2: Physical assessment, pain assessment. Retrieved 12;42 July 26, 2021 https://opentextbc.ca/clinicalskills/chapter/2-1-1-focused-pain-assessment/
NURSING FUNDAMENTALS 11.3 PAIN ASSESSMENT METHODS
OPEN RESOURCES FOR NURSING (OPEN RN) by the Winconsin Technical College System
https://wtcs.pressbooks.pub/nursingfundamentals/chapter/11-3-pain-assessment-methods/
Open EMR Vital signs LAT MODIED SEPTEMBER 2012. reTRIEVED jULY 26, 2021, https://www.open-emr.org/wiki/index.php/Vital_Signs
Temporal Scanner Thermometer Training by Monroe Community Hospital 2015, Retrieved 21:55 July 26 2021 https://vimeo.com/124637296
Temperature strips and stickers_Strip Forehead Thermometer March 23, 2020, Retrieved 22:39 July 26, 2021 https://www.youtube.com/watch?v=Tlbu1WeHPEM
Assessing Respirations by TCC ADN RN Program: Nursing Skills January 1, 2015. Retrieved 23:18 July 26, 2021, https://www.youtube.com/watch?v=ZeMR16qWo_w
Jarould. Single head Stethoscope. Wikimedia Commons November 23 2017, Retrieved: July 27, 2021. https://commons.wikimedia.org/wiki/File:Stethoscope.svg
Vital Signs (Client Care)(Nursing) Part 3 Retrieved 01:45 July 27, 2021, http://what-when-how.com/nursing/vital-signs-client-care-nursing-part-3/
Taking a Patient’s Temperature by University of Virgina Health System-Medical Media Series. Retrieved: 11:10 July 24, 2021 https://youtu.be/rFFFvunPES8
File: Vitas1.png by openEMR modified August 26,2011, Retrivied: 01:56 July 27,2021 https://www.open-emr.org/wiki/index.php/File:Vitals1.png
References for the Medical terminology section:
Gibson, M., Pain classification WikiDoc. Retrieved:July 24, 2021, https://www.wikidoc.org/index.php/Pain_classification
Afebrile DictPedia. Retrieved: July 24, 2021, https://en.dictpedia.org/en/afebrile
Apnea Wiktionary. Retrieved: July 24, 2021 https://en.wiktionary.org/wiki/apnea
Arrhythmia Wiktionary. Retrieved: July 24, 2021, https://en.wiktionary.org/wiki/arrhythmia
Auscultation WikiDoc- Retrieved: July 24, 2021, https://www.wikidoc.org/index.php/Auscultation#:~:text=Auscultation%20is%20the%20technical%20term,verb%20auscultare%20%22to%20listen%22.
Ryan, S. Atrial Fibrillation Resouces for Patients. Retrieved: July 24, 2021, https://a-fib.com/glossary/
Carotid Pulse The free Dictionary Retrieved: July 24, 2021, https://medical-dictionary.thefreedictionary.com/carotid+pulse
Cyanosis Simple English Wikipedia, Retrieved: July 24, 2021, https://simple.wikipedia.org/wiki/Cyanosis#:~:text=med%2F3002,enough%20oxygen%20in%20the%20blood.
Diastolic Blood Pressure Boundless.com, Retrieved: July 24, 2021, http://kolibri.teacherinabox.org.au/modules/en-boundless/www.boundless.com/definition/diastolic-blood-pressure/index.html
Fever Queensland Government, Retrieved: July 24, 2021, http://conditions.health.qld.gov.au/HealthCondition/condition/8/121/317/fever
Anatomy and Physiology Homeostasis Lumen, Retrieved: July 24, 2021, https://courses.lumenlearning.com/nemcc-ap/chapter/1558/
Jabeen, M., Adnan, A., Summaiya, I., Maham, R., Zarghoona, W., Sheema, S., Zhn, S., M., Sumrina, M., An Assessment of Difference in Manifestations of Mixed and Isolated Hypertension In Terms Of Their Signs and Symptoms in Hypertensive Patients, Palliative Medicine & Care: Open Access Symbiosis January 2018, Retrieved July 24, 2021. https://app.dimensions.ai/details/publication/pub.1105384075
Hyperthermia Simple English Wikipedia. Retrieved: July 24, 2021, https://simple.wikipedia.org/wiki/Hyperthermia#:~:text=Hyperthermia%20is%20a%20high%20body%20temperature.&text=Doctors%20define%20hyperthermia%20as%20a,Fahrenheit%20(37%20degrees%20Celsius).
van Velzen., M., Dahan, A., and Niesters, M., Neuropathic pain: Challenges and Opportunites by frontiers in Pain Research Front. Pain Res., 07 August 2020 Retrieved: July 24, 2021,| https://doi.org/10.3389/fpain.2020.00001
Jacques, E., Piracha, K., J., The difference between Somatic and Visceral Pain. Verywell health May 08, 2020 Retrieved: July 24, 2021, https://www.verywellhealth.com/differences-in-feeling-somatic-vs-visceral-pain-2564645
Introduction to Sensations and Perception Phantom Limbs, University of Minnesota. Retrieved: July 24, 2021,https://pressbooks.umn.edu/sensationandperception/chapter/phantom-limbs-draft/
Radial Pulse The Free Dictionary by FArLEX Retrieved: July 24, 2021, https://medical-dictionary.thefreedictionary.com/radial+pulse
Boundless Anatomy and Physiology, Cardiovascular System blood Vessels, Systemic Blood Pressure by Lumen. Retrieved: 11:05 July 24, 2021, https://courses.lumenlearning.com/boundless-ap/chapter/systemic-blood-pressure/
Tachycardia Simple English Wikipedia. Retrieved: 11:05 July 24, 2021 https://simple.wikipedia.org/wiki/Tachycardia
Clinical Procedures for Safer Patient Care. Signs and Symptoms of Hypoxia BCCampus Retrieved: 11:10 July 24, 2021 https://opentextbc.ca/clinicalskills/chapter/5-3-causes-of-hypoxemia-2/
